Tuesday, May 14, 2013

Kinspiration

So I wanted to show you guys all the plans I have for my kitchen. All of these images are either from Pinterest or Better Homes and Gardens, I don't own any of them.


This picture, even though is technically of a dining room, is my main inspiration for the whole kitchen. I love the contrast of the dark floors, matching countertops and dark gray color of the walls with the white cabinets would look amazing.
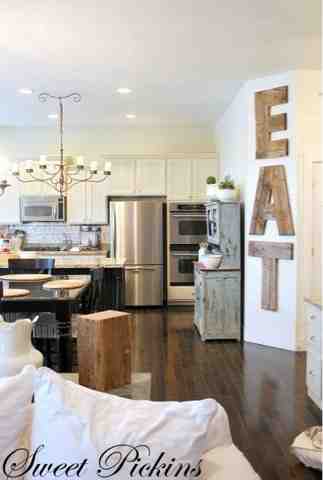

Here is another example of that contrast, but the main reason I chose this picture is the giant word. I completely plan on making this for my kitchen, I even have a little wall (that will be hosting our entry table) that has no real purpose because it is too tiny. I plan on making a tutorial for you guys!


The bad thing about ripping out cabinets is you have to pay for whole new cabinets from scratch instead of fixing the ones you have. The good thing is I can build this baby around my fridge. While mine will not be nearly as extravagant, I plan in doing something similar. 


Come on, how awesome is this? I've always thought those white plastic trays were one of the trashiest looking things about kitchens, yet I have one right in my drawer. This, if I can find it, is something I totally plan on getting. Like I said earlier, the sweet part about tearing out cabinets is freedom, the bitter part is the price.


While I don't really like this kitchen, I love the shelf under the cabinets for small appliances and decor, it really frees up counter space, which after living in an apartment that leaves me with half a counter to cook on is a big deal.


And finally, I love the relaxed feel of this kitchen. I definitely want a country cozy look to my kitchen, but I want a seriously modern updated version of that. Make sense? Not to me either, but I look forward to getting my kitchen done finally and seeing what look I'm talking about.


Monday, May 6, 2013

D.I.Y. Colored Labels

So I have seen a ton of posts on Pinterest about using chalkboard paint and labels to easily make chalkboard labels (which, when we move into the Leaky Cauldron I totally plan on doing for the pantry, because that is awesome). But, I needed some pretty labels that I intended to keep permanently labeled, and would be shoved into a bag and probably wiped off.

So I just painted my labels a really pretty color and wrote on them with a Sharpie. It is really simple, takes about five minutes plus drying time, and I liked the outcome, although I feel like it could be done a little better if I wanted to spend more time.


Here is what you will need:
Paint (your choice of color)
Paintbrush
Labels
Paper Towel


You just put a tiny dollop of paint on your paper towel and lay your labels on the paper towel as well. This is to prevent mess and have a super easy clean up.


Paint over the labels. I really wanted a brushed look instead of a smooth solid color, so I only applied one layer and didn't pay too much attention to the details.


Then to pizazz them up slightly I added the parenthesis to put around whatever label I came up with. It ended up looking alright, but not great.


And finally, let it dry and you can peel and stick them to whatever you want! I am planning a toddler bag organization post soon so I will be using these for that purpose! I really hope you enjoyed the post!


D.I.Y. Face Mask

So today I am going to show you guys a really fun cheap face mask. If you are a fan of my YouTube channel, Truderds, you know how I've recently discovered some pretty toxic stuff in common makeup. It's scary, especially when there are so many more natural remedies out there.

This mask is something I originally saw on Pinterest, but I can't find the original source anywhere. So if anyone has seen it, please let me know so I can give credit where it is due.

Let me just tell you though, it's awesome. Even day after, my face feels so much softer and my skin is a little more clear.

What you need:
Half a lemon
2 tbsp honey

All you have to do is cut a lemon in half, and pour the honey on the lemon. Then take your lemon and just rub it on your face. Simple and cheap right? You let it sit for five to ten minutes (i recommend using the other half of lemon in a glass of ice water and sitting back to relax.) and then you wash it off with warm water and enjoy your new glow! Natural, effective and no nasty chemicals!


Why does this work? (Also, please ignore my chipped nail polish!) Honey is a natural anti-bacterial and inflammatory. It absorbs the impurities from skin while you're letting it soak. Lemon helps naturally lighten, exfoliate, clean and tone skin because it is full of vitamin C and alpha hydroxy acids. Beat that $10 face masks!

Let me know on Twitter or Instagram if you try this out! 

Wednesday, May 1, 2013

D.I.Y. Wrap Bracelets

So here I am with one of my first tutorials! I made it with some of the craft materials that I bought yesterday and I am super in love with it. I plan on going back and getting more after pay day. This was such a cheap fun thing to make that took like ten minutes. I ended up with a really awesome bracelet I would have paid $12-$17 for at the stores!


I made my own wrap bracelet! These things are "all the rage" right now and I really love the hippie/boho look they give. Nothing like layering on the bracelets to accomplish a really fun summer look.


Here is what you need:
Scissors
Some sort of leather string (or really whatever you want your bracelet to be made of, as long as it is long!)
Charm/charms
A Rope Toggle
4 Circle Jewelry Clasps


The charm I bought was originally supposed to hang from a bracelet rather than held from the middle, so I just cut off the top loop with scissors. It was really simple, obviously if your charm does not have this you can skip this step.


Next I folded my rope in half and snipped the end (above) so I could have two even pieces. I folded those in half too (below).


Then I took the folded end of my rope and looped it through the charm. I put it over the charm and pulled it under. If you are going for a different look you can look it up from the back too, but I preferred this fold for the front.


Then I took the cut end of the rope and pushed it through the loop without removing it from the charm. Pull tight and you have your charm attached. Repeat for both sides.


Next I took the loose end of the rope (it doesn't matter which one you start with, you'll be doing the same thing with all ends) and tied it around one of my circle clasps. Pull it as tight as you can get it.


Next, attach your circle clasp to one end of your rope toggle. That is one strange sentence.


And repeat. Exciting stuff!


I snipped the excess string for a neater look, I suppose this is optional.


And repeat the tying of the rope and the attaching of the circle clasps to the rope toggle.


Wala! You're done! You have a totally awesome wrap bracelet you made yourself!


Send me pictures of your completed wrap bracelets on my instagram or twitter. I'd love to see them! 

Tuesday, April 30, 2013

Craft Haul (April)

So I went to the heavens of crafting world today, Hobby Lobby. I've just been in a really creative mood and have been dying to do some serious crafting. But since I have been focusing in so much else lately my craft supplies have diminished. Leaving me with nothing to just pick up and create with.

So I got a couple of things I've really been wanting to do, and with my coupon, it was all just fifteen bucks.

The first thing I got, which I just thought of making when I saw this super cheap yellow leather rope was making my own wrap bracelet. I have been wanting one forever, but they charge you like fifteen dollars for one, pretty much where ever I look, because they are so popular. So I spent $1.99 on my charm (the peace sign), $2.47 on the yellow leather that will actually make the bracelet, and $1.47 for two clasps, so I can make something else later too.


The next thing I got I was really excited for. When Stacy and I were at our local bookstore we saw these totally awesome tote bags that had book related things on them. Problem was, they were $30.00. I almost got one anyways, because I really loved them. But I decided to hold off and I am glad I did. I got a tote bag double the size with two front pockets for $4.99. I bought paint for about $1.50 each so I can paint the quotes on myself and spent 1/3 of the cost.


The last thing I got I was also super excited to find (maybe its just crafts that make me excited?)  This twine cost $3.50 for 400 yards. While it is kind of thin and will take a lot for the craft I want to do, it was such a cheap price that I couldn't pass it up. When I looked at Wal-mart for twine I was turned off from the craft immediately because the twine there was so expensive, and I was super bummed out because I love the country look that is so trendy for houses right now.


So what have you guys been spending your crafting energy and money on lately? Send me a picture on twitter, instagram or tell me about it below!

Sunday, April 28, 2013

Leaky Cauldron (2) - A Home Update

So unfortunately, not a lot has been finished over at the Leaky Cauldron. The family friend we had completing a lot of the projects ended up being a little too sneaky for us, so we have hired someone new who we are hoping is up to completing the task.

We had a super frustrating yet fulfilling day today in LC world.

First the hubs and I went to our local IKEA to price cabinets. Boy, was that a headache. I finally understand why everyone says its a great store but you have to put everything together. Having only bought furniture before, I'm like uh duh. But now that I've tried to buy something real there, I understand how hard it is to remodel there. You have to pick out handles and cabinet fronts, the bases and counter tops, how many drawers and a lot more. And none of it is in an area all together.

After that nightmare we went to Lowes to check out floors.

We ended up picking out the floor for the kitchen and hallway. It's the same color we are planning on getting the countertop with.

This is the look I am going for.

So this is the floor we picked out.

I love it! I can't wait for everything to finally get started and I can start seeing everything coming together. As of right now its a mess and its looking like we may have to extend our lease for a month or move in with the fam until its completed. Something Emma would love, but would really mess up our schedules.

Ill keep you updated! ❤

Wednesday, April 24, 2013

A Beginner's Attempt at Couponing: Week One

So we have all seen or heard about these crazy women who save oodles of noodles on their grocery bill just by using an insane amount of coupons. After we all heard about this hype, we realized they were buying the apocalypse's worth of deodorant and toothpaste. Which, lets face it, we need it but we don't need 54 containers from one trip. But there are also people who coupon and actually buy real stuff, and while they're not saving 99% of their bill, a dollar saved is a dollar saved.

So I want to figure out this couponing process and I am taking you guys along with me.

The first thing I did was buy the Sunday paper. I only bought one, because I didn't really know if I would actually be sticking to everything or if I'd take a glance at all the work ahead of me and give up. Plus, I still really don't get the whole process, so I figured this would be he easiest way to learn.

Then I got my coupon binder ready. This is apparently the biggest and funniest step in couponing. I didn't go all out yet though. I used a binder I already had and I happen to have two baseball card sleeves already. So rather then buying a bunch of stuff, I made due with what I already had so far. If I keep it up, ill definitely buy more and get a lot more specific with my categories.

As of right now I have each slot holding a certain category, although I put two for pantry thinking I would need it more. I didn't. But here are my categories (so far):

Fridge
Pantry (2)
Freezer
Baking
Cleaning
Pets
Body Care
Sides
First Aid
Storage
Oral Care
Dishes
Air Fresheners
Outdoor
Baby
Miscellaneous

Anything that fits under that category gets stuffed into the slot.

I have heard that when you first start clipping coupons you should cut every single one even if you know you'll never use it. That's great and all, but I don't have time to cut coupons for adult diapers (this was a coupon this week, no joke) so I just cut the ones I may have even the slightest interest in. Some I may never use, but who knows. I ended up with a pretty good little haul for only a two dollar paper.

I only go grocery shopping twice a month, so ill just be grabbing another paper this Sunday since I already have all my groceries until next Friday.

I've heard the best way to coupon is to wait until something is on sale, but I cannot wait to start pulling out some of my coupons and saving some money! Send me a picture of what your coupon system looks like or if you try mine!